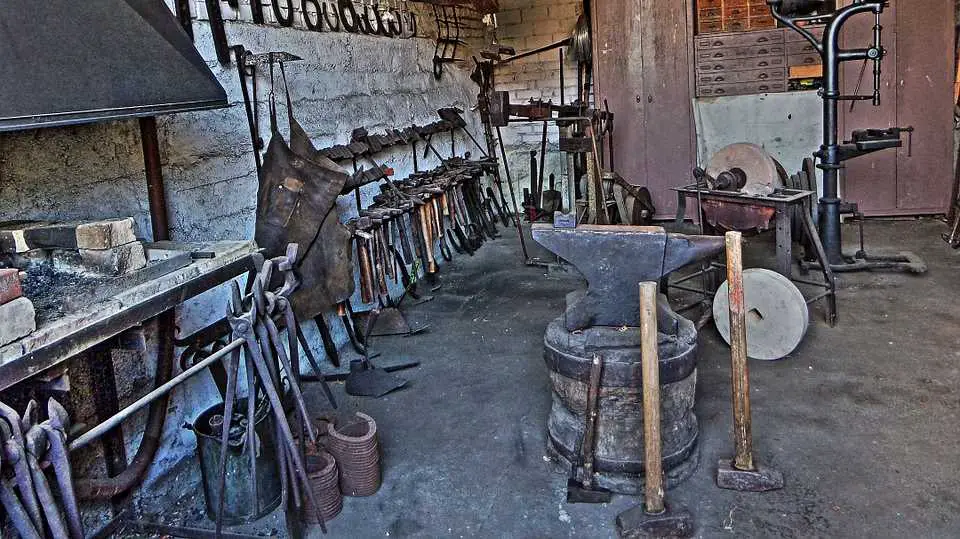
Blacksmithing is one of the few hobbies where you can make almost all the tools that you will need. With a hammer, a little stock, and a heat source, you can create just about anything.
Because blacksmiths have the ability to make their own tools, every blacksmith workshop is unique. Every shop will be a little different. Some shops will be filled with practical, no frills tooling that are built to get the job done and no more.
Some shops will be filled with highly ornamental tools, tools that encapsulate the creativity of the smith. And every shop will have unique, what-the-hell-is-this-thing tools; As it is so easy for smiths to make peculiar one-off tools for special projects.
Every shop is a reflection of the person who owns it.
Alright, that’s enough wiffle-waffle. Let’s get down to it and examine some of the most popular tools used in blacksmithing!
This article is more of a reference guide…
Please note, this is a loooooooooong guide on blacksmithing tools (easily 40+ pages without pictures). I really tried to leave no stone un-turned. I believe that this guide is a good comprehensive overview on blacksmith tooling – although I may be biased!
With your hammer, a bit of steel stock, and these tools, you will have all the tooling that you need to begin forging.
Pro tip:If you are looking for a specific tool, you can search for it on the page by pressing ctrl+f! Most phones will have a search option as well.
1. TONGS
Tongs are one of the blacksmiths most essential tools.To prove my point, you can go without a proper anvil by using an ASO – anvil shaped object. The only real requirement for an anvil is that you have a flat hard surface to strike on.
I have also seen people smith without a proper hammer by using impromptu striking tools. While I wouldn’t recommend this to beginners, I must also stress that you shouldn’t worry about getting the perfect hammer. If you are a beginner, I have a guide that can help you quickly choose a blacksmithing hammer.
But at some point, all smiths will need to move the glowing piece of stock from the forge. Even if you plan on hand making most of your tools from raw materials, you will most likely have to buy a pair of tongs when first starting out.
Hell, it’s hard for me to even imagine what the very first smiths of mankind used in place of tongs. How do you smith if you can’t grab your stock? And how do you build a pair of tongs if you can’t grab your stock?
My guess would be that the very first smiths used a pair of disposable greenwood sticks, but that’s hardly more than a guess.
At any rate, because many tongs are hand-made by a smith for a specific purpose, it’s impossible for me to cover every tong that has ever been used. However, I will cover some of the most important concepts.
Most tongs vary by handle length, handle grip, and the shape of the jaws. When buying your first pair, you should pick a handle length that will allow you to easily grip the stock you plan on using.
Tongs are, after all, a first class lever. The longer the handle, the less force you need for gripping. This is also why the fulcrum is up by the jaws.
Which handle grip you choose will largely come down to preference. Jaws are seemingly a little more confusing, as there are so many different varieties to choose from.
For example, here are some of the jaws available:
- Flat Jawed
- Straight Lipped
- Pickup
- Bolt
- Box
- Semi-Box
- Side
- Hammer
- Wedge
- Side Lipped
- Adjustable
- Round Nosed
- V-Bit
- Bolt Jaw Tongs
- Bow Tongs
- Anything else you can think of, there are more varieties than this!
All the different jaw types are used for different sizes and shapes of stock
If you are first starting out, I would recommend using tongs with a V-Bit jaw or a box jaw. The V-Bit tongs in particular are good, because they can be used for round or square stock; they are quite versatile.
I do recommend some caution, as using the wrong pair of tongs for the job may lead to you accidentally dropping your glowing hot stock!
If you are looking for a pair of starter tongs and this guide has you more unsure than before, check out my popular No bullshit guide to picking your first pair of tongs.
Tong Rings, Tong Clips And Other Tong Accessories
While it’s easy to see how the hammering hand can get tired from a day’s work, many people underestimate how tiring it can be to hold onto a pair of tongs all day.
This problem of tong hand fatigue is often especially prominent among new smiths, who have a tendency to death-grip their tongs as if the tongs were alive and trying to wriggle out of their hand.
Luckily there are some tools that can help relieve the death grip phenomenon, and will reduce the amount of work necessary to keep the tongs closed. These tools come in a number of varieties such as:
- C hook
- S Hook
- Rein Rings
- Chain Links
- Custom Solutions made with the materials at hand
2. Anvils
Anvils are an iconic tool to the blacksmithing craft, and are one of the first tools that come to mind when I think about blacksmithing. They provide a flat striking surface and a sturdy base from which to work.
However, I think most beginners fuss too much when it comes to picking their first anvil. The stakes are just not that high, as you can use almost any flat surface for striking. For your first project, I highly recommend just grabbing a cheap anvil or block of steel and using that.
Once you have a few projects under your belt, then you can decide whether or not it’s worthwhile to buy a bigger anvil. You will also at some point want to find something sturdy – like the floor- to bolt your anvil down onto. However, I don’t recommend this until you have a few projects under your belt; make sure you will enjoy this hobby before you spend a bunch of money on it.
Most anvils that you see are called london style anvils. These are the most common anvils available, and are nearly ubiquitous.
These anvils are simple enough, they are composed of a few basic parts. Most prominently, you have the face of the anvil, which is where most of the striking work occurs. London style anvils also come with a horn, which is used for bending metal into circular shapes.
Near the heel of the London anvil is the hardy (hardie) hole, which is a square hole that is used to hold hardy tools in place.
Next to the hardy hole is a pritchel hole. Pritchel holes are circular and are generally smaller than hardy holes. Pritchel holes are used for punching, making bolt heads, and bending appropriately sized rods.
While most anvils are London anvils, there are alternatives. These include:
- Swage Blocks
- Stake Anvils
- Lieges Anvils
- Square Anvils
- Double-Horned Anvils
- ASO – Anvil Shaped Object
Swage blocks are heavy hunks of steel that contain cavities in the striking surface. These cavities are used for circumstantial blacksmithing functions such as forming, bending, and cutting. I have come across many unusual swage blocks, as many are custom made.
While most swage blocks have a square shape, they may also be hexagonal, octagonal, and diamond shaped.
The lieges anvil is very similar to the london style anvil. The main difference is that it is missing a pritchel hole, and the hardy hole is by the horn instead of the heel.
Stake anvils are not as common anymore, but they used to be ubiquitous. They are small anvils mounted on a stake; the stake is used to insert the anvil into stumps or the ground. These anvils were handy for small scale farmers and shop owners who needed to make quick field repairs.
It’s important to also look at the material composition of the anvil. Cheaper anvils tend to be made out of cast iron, while higher quality anvils are made of cast or forged steel. Many anvils have a base made of cheaper material, with a bouncy steel plate for the face.
The common consensus online for a long time was that “good” anvils have a “bounce” to them. In theory, this bounce reduces the effort necessary to bring the hammer back in the air. A bouncier anvil is said to be easier to use, and will supposedly help the smith to avoid issues such as tendonitis, which may be caused by overexertion.
Recently though, there has been some push back against this idea. Some are arguing that all the force from the blow should be going into the stock, thus there is no mythical hammer bounce.
I wouldn’t worry about this too much, but I think it’s helpful to point out to new people that this is a debate that is currently happening in the online blacksmithing community.
Porter Holes In Anvils
Some anvils have little square holes in the waists of the anvil. These holes are called “porter holes”, and were used to help workmen move the anvil during manufacture. They are common in older anvils.
Hardy (Hardie) Tools
A hardy tool is a tool with a square shouldered shank that fits into the hardy hole. The shank prevents the the tool from rotating when the tool is in use.
Because experienced smiths will often make custom hardy tools for specialized purposes, it’s not possible for me to go over every hardy tool you may come across in your journeys. I will however go over some of the more standard tools that are in use.
Hardy Hole Size In Anvils
Most contemporary anvils have a square hardie hole that is 1” across. Naturally, most hardie tools are sold with a 1” shank.
It’s still important to pay attention to hardie hole size when purchasing anvils or hardy tools. You can’t assume that you need 1” especially if you are using older equipment.
Hardy hole standardization is a relatively( in the history of blacksmithing) new phenomenon. Drilling/broaching technology has allowed modern manufacturers to produce most anvils within +- .005 of specification. But it was not always like this…
In medieval europe, hardie holes were often ½”, and were not necessarily placed near the heel of the anvil as they are today. I should stress that while many were ½”, there were no standard sizes;you can find anvils and hardy shanks of a wide variety of sizes from these earlier eras.
Hardy Shank Fitting
If you don’t like how your tool fits in the hardie hole, you can always play with it to make it thinner or fatter. How snuggly your hardy shank fits into your anvil largely comes down to preference.
I don’t like hardy shanks that fit too loosely or too snugly. If the fit is too tight, it can get stuck. This is a real pain in the ass for tools that are small or have sharp edges as they are ungraspable.
To avoid the over-tight fit, I sometimes put a slight taper to the hardy shanks; you don’t want to go overboard with this however. When striking a tapered hardy tool, you may be putting force on your anvil and on your shank in a less evenly distributed way. This can cause the shank to snap, or even worse, the heel of your anvil to snap. Of course this depends on the materials in use, the size of your taper, etc etc.
If you are a newer smith, don’t stress out about the fit too much. Fitting is easy to fix, and as you gain experience in smithing you will naturally develop your own preferences for hardy shank fits.
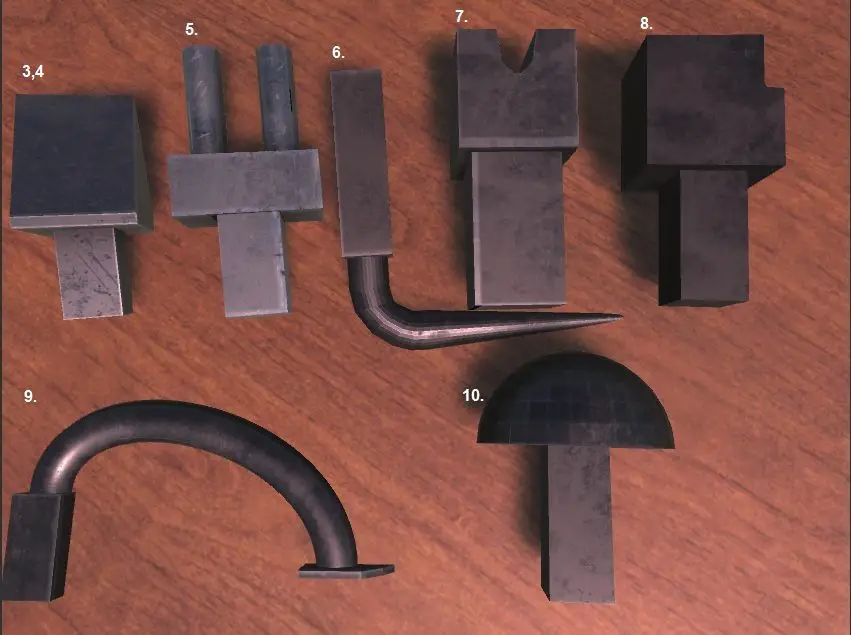
3. Hardy
The first tool is simply known as a “hardy.” While that sounds like a dirty innuendo, a hardy generally refers to a hot cutting chisel that fits into the hardy hole. These are handy for cutting off or splitting bar stock without a helper. Hot cutters have a sharper edge and are used when the stock is hot – duh.
4. Cold Cutter Hardy Tool
These are similar to the hot cutters, but they have a more obtuse edge that can stand up to cold cutting. They are also generally tempered to be less brittle. It’s recommended not to do hot cutting on a cold cutting tool, as it causes the tool to lose its temper.
5. Turning Forks – AKA Bending Fork
At some point you are going to need to bend stock into some sort of curved shape. There are several ways to do this, and one method involves using a bending fork. As indicated by the title, bending forks go by many names, and can also be called a scrolling fork or a turning fork.
These forks can have many different designs, but they all have 2+ upright poles that are at least the thickness of the material being bent.
They can be hardy tools or hand held forks.
They may take up the entire length of the anvil or they may be narrow, with the poles close together.
All these tools are used in a similar fashion. The upright poles are used as a fulcrum point to apply pressure to the stock as you apply blows. This allows the smith to quickly bend the metal to the desired shape.
6. Anvil Bick – AKA Hardy Bick
Hardy Bicks are essentially L-shaped horns that fit into the hardy hole.They can be used to bend metal at various angles just like the anvil horn, but they are smaller and more convenient to store.
They can be built with or without the thickness-taper that you see on anvil horns; using a bick without a taper can make it easier to bend at a consistent angle while working.
7. Hardy Swage
Hardy swages provide a flat surface with a built-in cavity for metal shaping; they also have a hardy shank that allows them to be slotted into your anvil. They are a smaller and more convenient alternative to the bulky swage blocks discussed earlier.
The use of the hardy swage depends on the size and shape of its surface cavities. A common hardy swage design has a cylinder shaped cavity and is used to round out square stock.
8. Halfpenny Snub End Scroll Hardy Tool
This tool is a square block of steel 1 1/2 -inches and 2 inches deep, with a square hardy shank to anchor it. It has a rounded top, and one side of the tool has a concave impression. This is a niche tool used for scroll work – it is used to create a snub end scroll. The concave impression may be used to form the scroll tip. To use it, all you have to do is strike the stock until it matches the curvature of your tool. This allows for consistent size and shape when scrolling.
9. HoldFast – AKA Hold-Down Tool
This is a tool that is used to help clamp down a piece of stock to your anvil. They are often used as hardy tools but I have seen a number of smiths make a pritchel hole version of the holdfast.
I find them useful when: I’m working alone, I need both hands for other purposes, or if I’m working with an unusually unwieldy piece.
They are used in a similar fashion regardless of whether they are a hardy or pritchel hole variety. To use the hold fast, place the stock on the anvil, and then slide the holdfast over the top. After this, “set” the holdfast by tapping the top of the holdfast; it should then be holding down your stock nice and snug.
How you unset your holdfast depends on your anvil. Many anvils have a thin heel which allows you to simply tap the underside of the holdfast to unset it. For some larger anvils, this may be hard to get at, so you can unset the holdfast by tapping the side of the holdfast near the hardy hole.
There is no need to repeatedly strike the holdfast in order to set it. Repeated striking doesn’t’ usually make for a tighter fit, and it can damage your tool or your anvil. One or two taps is enough!
Avoid using materials with low tensile strengths when using holdfasts; this includes both the anvil and the holdfast. Using a holdfast in a cast iron anvil can damage the anvil. Cast iron holdfasts have a tendency to shatter. Spring steel usually works well for holdfast construction.
10. Mushroom Hardy
Mushroom hardies are useful tools as they fill in the empty space of bowl shaped objects. They are used for planishing – in other words, they are used to smooth out small irregularities in dome shaped objects. The mushroom shape must match the desired contour of the final product.
These tools are useful for making spoons, ladles, bowls, and any other object with a concave shape. If you find yourself doing a lot of planishing for business purposes, there are pneumatic plannishers that will greatly increase your productivity.
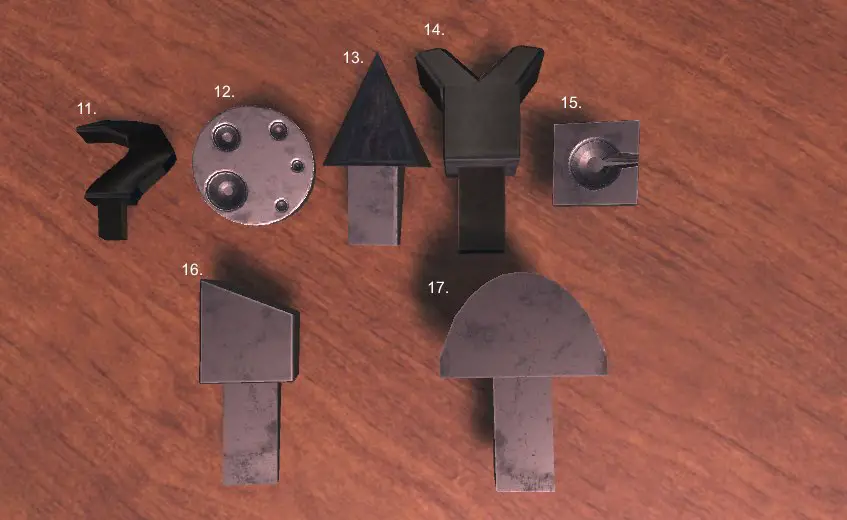
11. Swan Neck Hardies
Swan Neck Hardies are a broad class of tools that are generally used for scrollwork. These tools derive their name from their curved “swan like” shape. They are generally used as scroll starters, which allow the smith to have a consistent scroll shape. They also reduced the amount of effort needed when scrolling. Using the tool is pretty straight forward, all you do is bend the stock until it matches the curvature of the swan neck tool.
12. Rivet Bucking Hardy – AKA Rivet Header
A rivet bucking hardy is simply a block of steel that has concave divots; In this respect it’s very similar to a swage block. As with all the hardy tools I have discussed, it has a square hardie shank underneath head of this tool.
Most rivet bucking hardys have multiple divots that are machined into precise sizes that are used to form pleasingly round rivet heads.
13. Cone Hardies – AKA Mandrel Hardies
Cone hardies are metal cones that fit into the hardie hole and used to set and correct rings after they have been formed. The are used to make all kinds of ring shaped objects.
14. Dog Bone Swage Hardy
These swages are used by blacksmiths and tinsmiths to turn leafs, to form ladle ends, petals, and candle cups .
15. Rose Petal Swage
As the name would suggest, Rose Petal Swages serve the specific purpose of forming Rose Petals. If you are doing intricate ornamental rose petal work, these hardies are huge time savers!
16. Hardy Butcher Tool
These tools are used to help form nice, even shoulders on a piece of stock. They are not strictly hardy tools, however I often use them in hardy form. Hardy butchers are also called “bottom butchers,” as they are put beneath the stock – this distinguishes them from top butchers.
Side note – the guillotine tool is simply a bottom and top butcher used in conjunction.
Despite its name, the butcher tool is not all that sharp, as it is used for forming shoulders rather than cutting. To use this tool, simply stick the shank in the hardy hole, put a piece of heated stock on top, and strike down on the stock until the shoulder is of desired length.
Butchers come in a wide variety of edge angles, allowing for different shaped shoulders. Most bottom butchers are straight, but I have seen curved butcher tools that almost look like wide gouges.
17. Bottom Fuller Hardy
A button fuller is a tool that has a rounded or parabolic head that sits on top of a hardy shank. Despite its name, it is often used to thin out stock by spreading it apart. Bottom fullers are versatile and are used to give a variety of rounded shapes and shoulders on a piece of stock. After fullering, you will often need to to smooth out the corrugated stock surface with a hammer or flatter.
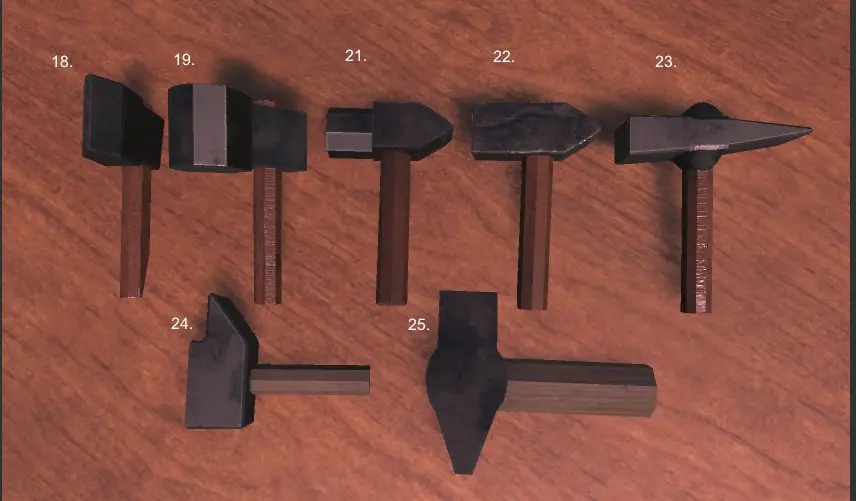
18. Top Fuller
Like the bottom fuller, the top fuller is used for grooving, thinning, spreading,stretching, and finishing round corners. The top fuller is different from the bottom fuller in that it has a handle instead of a hardy shank.
Top fullers are used by holding them above the stock and striking the top of the fuller. Top fullers come in both straight and cross peen varieties – more on what that means later.
19. Cheese Fuller
Cheese fullers are used for the same purpose as other fullers. The primary difference is that the cheese fuller has a fuller head in the shape of….a wedge of cheese! The fat, circular end of the cheese head is used as the striking surface. This makes forming shallower fullering grooves easy as pie!
20. Metal Working Hand Hammers – AKA MetalSmithing Hand Hammers
What is the best hammer for forging? This is a common questions for new smiths, sadly, the answer is the dreaded “it depends.” Ultimately, you want something comfortable that gives you the control you need. Most smithing hammers are between 1.5lb and 3 lbs.
I should also clarify on the word “Peen”, In the context of hammers, it simply refers to the shape of the hammer behind the main striking surface. Don’t get confused with the process of peening, which is a process of working a metals surface to reduce tensile stresses that develop during cooling.
The type of peen you will choose to use depends on how you are trying to shape the piece of stock and where you are standing in relation to the anvil. A lot of times the choice of hammer simply comes down to comfort. Using the proper peen will prevent you from swinging your arm down at the anvil at an uncomfortable angle.
It may be helpful to look at a few specific varieties of blacksmithing hammers:
21. Cross Peen (Pein) Hammer
Cross peen (pein) hammers are one of the most common tools used in blacksmithing. They feature a peen that runs horizontal to the handle – meaning it’s wider than it is tall.
Cross pein hammers are incredibly useful for blacksmiths as the peen can be used to strike a cross section shaped dent in the stock. It can also be used as a fullering tool, however I recommend caution against striking your hammer with another hammer. If the tools are not prepared for this kind of work, you may damage both hammers and risk getting hit by shrapnel.
Interestingly, Cross pein hammers are also used by carpenters.
In addition to the traditional cross pein hammer, there are number of varieties which are named after the region they hail from.
22. German Square Faced Cross Peen Hammer
This is a very common variety of cross peen hammer. They are in my opinion the least stylized of the different varieties. They work just as well and are the easiest to make yourself. They have a square face, and a no frills wedge shaped cross pein on the back.
23. Swedish Cross Peen
Swedish cross peens are a little bit more stylized than other varieties.They feature a tapered cross pein that is narrower than the rest of the hammer head. The insertion of the cross pein is in the middle of the hammer head as opposed to the bottom – as in the french cross peen.
24. French Cross Peen
This is similar to other cross peen hammers in all respects except for a notch that is placed on the top of the cross pein. Most designs I have seen for french patterned hammers also have a slight taper to the cross pein.
25. Czech Hammer – AKA Hofi Hammer
This is a stubby hammer with a short handle and a square striking face. In addition, it has a wedge shaped peen. This style of hammer was popularized by a smith named Uri Hofi, who teaches blacksmithing techniques with an emphasis on ergonomics and efficiency.
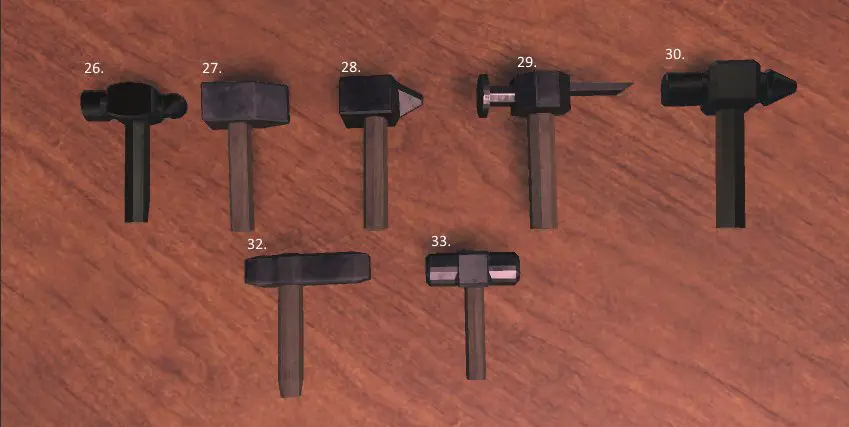
26. Ball Peen Hammer – AKA Machinists Hammer Or Engineers Hammer
This is another very common hammer type that has a ball shaped peen on the backside of the striking surface. The peen on this hammer is useful for rivet work and may also be used in any situation where the smith wants a round shaped crater on impact.
27. Straight Peen Hammer
Straight peen hammers are distinguished from cross peen hammers in that the peen runs the same direction as the handle. That means the peen is taller than it’s wide, while the cross peen hammer is wider than it is tall.
28. Diagonal-Peen Hammer
By now you are probably starting to figure out the hammer lingo and can deduce what this hammer looks like. It has a peen that runs diagonal in relation to the handle; these hammers help you avoid the awkward “chicken wing arm” scenario you sometimes run into with cross peen and straight peen hammers.
29. Chisel-Peen Hammer
These hammers have a peen that is in the shape of a sharp wedge. I personally don’t use them much, as I would rather just cut a piece of stock with a hardy.However, they are a useful tool in some situations.
30. Clipping Hammer
Clipping hammers are often used by farriers and feature a round striking face. The peen features a cone shape with a very “soft” point – meaning it has no sharp edges and is a “round” point. These hammers are used by farriers for horse shoe clipping. The clip on a horse shoe is simply a little flap, for more information, check out: https://www.americanfarriers.com/articles/7745-drawing-clips
31. Planishing Hammers
These hammers are used for planishing, which, as we discussed earlier, is the act of smoothing out a piece of sheet metal. Most planishing hammers are pneumatic and can be used with a number of different dies.
Dies function in a similar fashion to anvils and are the bottom contact surface. Dies come in a variety of shapes which allows you to smooth both flat and curved surfaces.
Hand planishing hammers exists, but they are usually used for softer non-ferrous metals.
32. Japanese Blacksmithing Hammer
Japanese blacksmithing hammers are an unusual hammer that are often used when making knives or blades. They are very unbalanced, the handle is inserted into the back end of the hammer head and there is no discernable peen. Japanese blacksmithing hammers allow the smith to strike very powerful blows, as both the shaft and hammer head design allow for maximum force distributed over a small striking surface.
33. Rounding Hammers – AKA Brian Bazeal Style Hammers
These hammers are simply hammers that have round striking faces. There usually isn’t a noticable difference between the striking face and the peen, although some rounding hammers will have a round striking surface on one end, and an octogonal striking surface on the peen.
Some people try to turn “round faced hammers vs square faced” into some sort of religious debate…I recommend ignoring these people, it largely comes down to preference.
Some people like square faced hammers because it’s easy to use the square edge as a fuller, allowing for quick adjustments on the fly. It can be easier to form shoulders, necks, and stems with a square face.
Some people like round hammers because the round striking face evenly presses the stock into all directions around the strike area. People who use round hammers argue that with practice, you can make almost any shape with a rounding hammer without changing hammers, while with a cross pein, you may need to switch to a straight peen etc etc.
Ultimately, both hammers work wonderfully, and it comes down to the smith more than the hammer shape. With both square and round faces, the basic idea is to use the edges of the anvil, and the edges of your hammer to your advantage. Learning how to use the edges is beyond the scope of this article (it’s already really long), but learning how to do this will improve your smithing speed significantly.
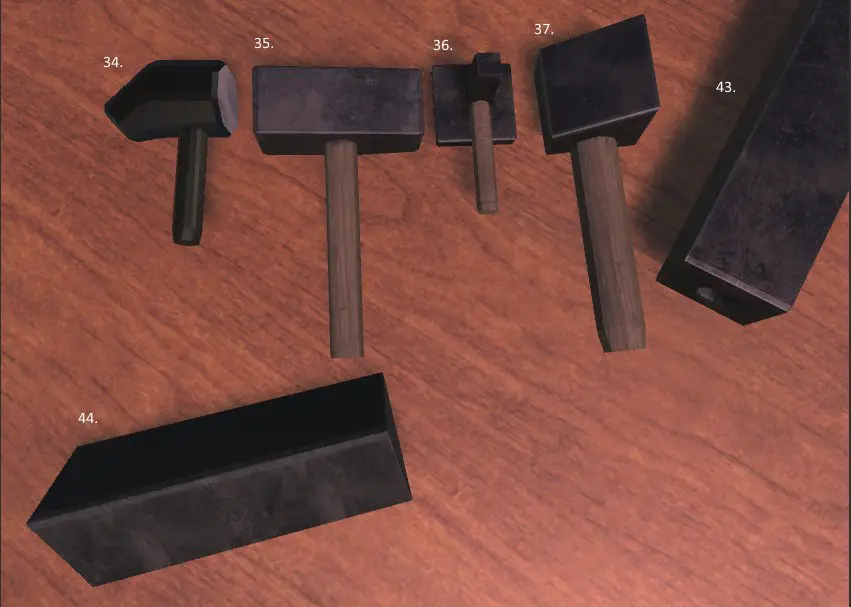
34. FileMaker Hammer
This is a peculiar hammer that is used to score flat pieces of iron by striking a small chisel in order to create files.I don’t see these around as much anymore, but they used to be common place back when files had to be made by hand.
35. Blacksmithing Sledge Hammer
Blacksmithing Sledge hammers are hammers designed to strike with some oomph. They have longer handles and larger/heavier heads. Smiths use these when they need to make large changes or are working with an unusually large pieces of stock.
36. Blacksmith Flatter
A flatter is a tool that is shaped like a hammer but is used more like a top fuller. As the name would suggest, a flatter is used for flattening irregular stock. It does this by have having a very flat face which is placed on the stock that needs to be flattened. The “peen” if you can call it that, is simply a square striking surface that is generally narrower than the flatter end.
To use a flatter, just place the flat surface on the stock, and strike the top side of the flatter with a heavy hammer.
Using a flatter is pretty simple; making a flatter is a little more difficult as it takes some finesse and skill to get a flat surface that is flat enough for a flatter tool. If you’re curious about how to make a flatter, I recommend you check out this great video that shows you step-by-step how to make one: https://www.youtube.com/watch?v=Nq0mCrCyQrE
37. Top Butchers and Side Sets
Both of these tools are used to square shoulders. Top butchers are generally used to square a shoulder quickly, and the blacksmithing side set is used to shoulder more precisely. The edge of a side set is generally bevelled to an angle of about 75 degrees.
38. Custom Made Hammers
Of course as a metalworker, you can always craft a hammer to your purpose. Making hammers is quite fun, and I recommend it to all aspiring smiths. Blacksmiths, for some reason, tend to be quite utilitarian, so I would encourage you readers to make a hammer that has an artistic flair to it; I promise you everyone who goes into your shop will notice it immediately….even if you never actually use it for forging : ).
Forging Machines and Power Hammers
Blacksmiths have been using machines to ease their workloads since ancient times. It’s easy to imagine the motivation for machining: smiths get old, they run short on help, they find themselves working with very large stock…these problems are as old as time.
39. Trip Hammers – AKA Tilt Hammer or Helve Hammer
Trip Hammers are huge hammers (often 100lb or 200lb ) that are raised up a set distance and then dropped on a piece of stock. These hammers are not used for production purposes nowadays, but historically they were used in both europe and asia.
Most historical trip hammers used a waterwheel and relied on hydropower to repeatedly lift the massive hammer. While the hydro powered trip hammers were undoubtedly more efficient, not every hammer mill in ancient times had access to a river!
Therefore, there were also ancient trip hammers that relied on horse power or even man power to lift the beastly hammer. These were much more common in coastal towns, as cities in the past generally were built near some sort of water source.
40. Steam Powered Drop Hammers
Steam Powered Drop Hammers combined with advances in other metalworking technology slowly brought the demise of the historic trip hammers. Steam powered hammers followed in the general trend of industrialization and allowed manufacturers to worker on larger projects with a higher throughput. If you’re interested in more information, I highly recommend checking out the wikipedia page: https://en.wikipedia.org/wiki/Steam_hammer
41. Forging Presses: Hydraulic, Mechanical, Screw
While powered presses were not used in historical blacksmithing, they are used heavily in modern manufacturing processes, so I thought it would be worthwhile to briefly go over some of the more common ones.
42. Forging Hammers: Gravity Drop, Power Drop, Counterblow
Power Hammers are a more broad category of hammers that includes steam, mechanical, and air hammers.
43. Monkey Tool
This is a tool that is used for forming tenon shoulders on a rod. It’s basically just a piece of stock with a hole drilled into it; the hole is the size of the tenon it will be shouldering. Monkey tools are often used in conjunction with a vice. Generally the heated stock is clamped into the vice, and the monkey tool is hammered onto the tenon. All-in-all it’s a pretty straight forward tool, it’s easy to make and easy to use.
The monkey tool can also be used to make rivets.
One caveat: Make sure your monkey tool is quite a bit longer than your largest foreseeable tenon. I know it’s tempting to try and save stock by making a short one, but you are really just shooting yourself in the foot down the line.
Having a longer monkey tool serves two functions. First, it stops you from having to make a longer monkey tool later. You don’t want to have to stop what you’re doing to redrill your current monkey tool – or even worse, you don’t want to have to make another one from scratch.
Second, using a longer monkey tool helps with hand safety. When I use a monkey tool, my hand is essentially between a hammer and a hot piece of stock. This is a less than ideal scenario even if you are wearing gloves. My hands are my livelihood, and I want to protect them at all cost. A longer monkey tool keeps my hands away from the fire. Using tongs instead of your hands would be even safer, but that sounds clumsy The main point is, take care of your damn hands!
44. Anvil Devil
These are cheap little tools that are incredible handy for forming v-shaped notches into stock. They are usually made of heat-treated steel and are used by farriers and blacksmiths alike. Most Anvil Devils that I find are not made with a hardy shank, so they can be placed on virtually any flat surface. I personally like the stability that comes with hardy tools, so I made my own version of anvil devil that contains a hardy.
This tool is almost always neglected in lists of beginner blacksmithing tools. Which is a shame, as it is very handy.
45. Blacksmithing Floor Mandrel
This piece of equipment is a cone shaped utensil that stands on the floor. Mandrels are generally 2 to 4 feet high with base diameters ranging from 4 to 9 inches.
Higher quality mandrels also have a slot that runs from the point, to the base, on one side of the mandrel. This slot is used as a tong insertion point, which makes it easier to hold onto the stock. Some even have a removable mandrel hardy point, meaning that you can remove the tip of the mandrel and put it into a vice or an anvil.
Mandrels are used to form circular objects such as nose rings for oxen, hub bands for wagon wheels, round door knockers, and any other ring like object.The mandrel point can also be useful for making instruments that require a precise, pointy insertion/indention. Some examples would be something like a nozzle or a socket.
Smaller mandrels are also often used in jewelry making, as many pieces of jewelry are ring shaped.For example, jewelry such as: bracelets, necklaces, rings, etc are all ring shaped.
Mandrels are also very good at helping shape wire.
Jewelry mandrels are generally made of softer material such as copper to save on cost…
Speaking of costs, floor mandrels (the blacksmithing kind) are hard to find and often expensive as hell. They can run from several hundred dollars, all the way up to 1k+ for newer mandrels. Newer mandrels are made with higher quality (more expensive) materials than the older ones.
Partly because of this cost, most older mandrels that I have seen are made of cast iron. Mandrels are also hollow (usually), which makes them ring out like grimey industrial church bells.
46. Vice And Grips
I’m going to assume you all know what a vice is. Vices are incredibly handy tools and their utility can’t be understated. There are a dizzying array of vice types out in the world. I’m going to focus on the blacksmithing vice (duh), but if you are interested in the topic more generally, the wiki page is really good: https://en.wikipedia.org/wiki/Vise
47. Post Vice – AKA Leg Vice Or Blacksmithing Vice
This is a type of vice specifically made for the heavy abuse inflicted while forging metal. It is typically found close to the forge, and has a fast moving thread that allows the smith to maximize efficiency while the stock is hot.
This type of vice gets its name from the post that runs under the vice. The support from the post allows the smith to strike down with great force without damaging the vice. The back jaw is a continuation of the post.
Generally the vice is positioned to a comfortable waist-high height. This maximizes efficiency and comfort for most work, although vices may be placed higher for specific jobs.
As mentioned earlier, there are a wide variety of vice types. In a pinch, a machinists or other type of vice can be used, but they generally can’t stand as much abuse as a blacksmithing vice can.
Hitting stock that is clamped in non post vices can damage the vice. This is partly due to their not being designed for blacksmithing, and partly due to their material composition – they are often made of brittle cast iron.
48. Hand Chisels, Gouges, And Punches
Hand chisels, gouges, and punches are all handy tools for making small adjustments to a piece of stock. They are often handmade and come in more varieties than I could possibly ever cover.
They usually come in one of two forms. The first form is one that looks almost like a hammer. This type places the handle perpendicular to the chisel, allowing the smith to keep his hands away from the chisel head as he strikes the top end of it.
The second form is basically just a rod with the chisel head at the distal end. These are useful for more intricate work. The rod setup allows for maximum handling and control.
49. Hand Chisels
Hand chisels are useful for making small cuts or notches in a piece of stock. Different types of chisels feature different handle lengths and different cutting edges according to their purpose – I will get more specific down below.
50. Cold Chisels – AKA Cold Sets
Cold sets often feature short shanks and have obtuse edges(50-60 degrees), much like the cold hardy cutters. As the name would suggest, they are used to cut cold stock. As with the cold hardy cutter, do not use hot material with this chisel, it will ruin any heat treatment that the chisel might have.
Cold chisels are often used to create fracture lines in a piece of metal. Once the smith has a fracture line about ⅓ of the way into the material, it is then very easy to break off the piece using a pair of pliers and a vice. Of course, “very easy” is relative to the overall thickness of the piece.
51. Hot Chisels – AKA Hot Sets
Hot sets (also called splitting chisels) are basically the inverse of cold sets. They are designed to be used while cutting hot stock. They feature a sharper blade edge, and are not heat treated in the same fashion as cold chisels.
Although this is not a technique article, I do want to clear up one question I hear a lot, which is: how do I cut a straight line with the chisel? One mistake I often see people make is that they cut away from themselves – meaning they are moving the chisel farther away from their body with each blow.
This isn’t a fatal mistake, but it does make it harder to see the lines you are creating. Moving the chisel closer to you after each blow makes it much easier to line up your chisel and keep your cutting line straight! This technique with a bit of practice works very well in my opinion!
52. Gouges
A gouge, sometimes called a cow mouth chisel, is a curved chisel used to cut circular sections out of metal. These are handy whenever you are working with any kind of arc.
53. Punches
Punches are simple but satisfying to use tools. They were used primarily to create holes in stock before modern drills came into use. Today punches are often used to mark metal before heating; this mark is used as a guide. These guide marks can be made hot or cold.
Punching holes is always “hot” work. While it’s not necessarily economical to make holes with punches rather than drills, it’s very satisfying, and is done by both hobbyist and professional history reenactors.
Finally, punches are also used to “sign” a piece of work. This works similar to branding a cow. A smith can use their punch to create a custom made indentation that marks a piece as their work.
54. Blowers and Bellows
Put simply, fire is the heat byproduct of a chemical reaction between oxygen and a fuel source. Hotter fires will require more oxygen. Efficient blacksmithing requires a fire that is hotter than the typical campfire. Therefore, all forges require some mechanism for shuttling more oxygen into the forge fire.
55. Pre-Bellows History
It’s hard to tell exactly how blacksmiths stoked fire before the invention of the bellow. I suppose the most straight forward guess is that ancient smiths used a combination of the natural wind and a fan. There is archaeological evidence that suggest ancient forges had a tunnel that went under the forge and delivered this air directly to the heart of the fire – just as it is done today.
There is also evidence that some ancient smiths used wineskins or bags made out of animal innards as mechanical blowers. These tools were probably the precursors that inspired the classic bellows that we think of today.
56. Bellows And Air Valves
Natural wind is too unreliable for industry, and having someone stand by the forge and fan it all day is very inefficient. Simply put, the primitive bellows mentioned earlier were clunky at best. Luckily, bellow technology advanced rapidly with the development of a humble piece of equipment known as an air valve.
The air valve allowed the invention of the bellow as we know it today. With an air valve, air flow could be controlled and contained at the smiths leisure. While this improved the forging experience greatly, bellow technology didn’t stop there. Several improved designs for the bellow emerged over time. These designs in turn improve the forging experience even more.
All in all, the bellow was used for almost sixteen-hundred years before the invention of the electric blower. It is a classic blacksmithing tool.
57. Electric Blowers – AKA Squirrel Cage Fans
In the latter half of the nineteenth century, the electric blower was invented. In some ways these machines are actually simpler in design than the late bellows. They are just a fan powered by electricity. While they may lack some of the elegance and grace of a bellow, they are much easier and more efficient to use.
There are whole bunch of electric blowers a smith can use for a forge, and honestly, it’s not really worth it to go into detail. My advice is simple: just don’t overthink it. If you search on youtube, you can see that many forges use an undemanding hair dryer as the forge blower. Just hook the blower up to a tuyere(tuyere: a nozzle through which air is forced into a smelter,furnace,or forge), and set that tuyere to the center of your fire.
There are only a few things you have to remember:
1.Keep the blower far away enough from the forge so that it doesn’t get damaged by heat.
2. Don’t use a zinc coated tuyere, you can get metal fume fever this way.
Simple setups will get you going faster, but you may need to repair the parts more often if they are not designed for the job. There are more complicated setups that are more maintainable, but I won’t get into that today, as this is not a forge setup article.
58. Quenching Bucket – AKA Slack Tub
Quenching buckets are simply buckets that hold water/brine or oil. I have seen smiths use all different types of buckets. Your quenching buckets really only have to have 3 characteristics:
- They have to be able to withstand the heat.
- They have to be large enough that you can slosh your stock around in the bucket.
- They have to be able to withstand weather.
Let’s examine those one by one.
The first point is pretty obvious, you don’t want a plastic bucket that will melt and spill boiling hot liquid all over your workshop.
The second point is important too, when you quench a piece of steel in a liquid, a film of vapor forms around the stock in the earlier phases of quenching. Agitating this film and moving the stock up and down in the bucket helps create a more consistently hardened piece. Be wary of going side to side with thin pieces, as this can warp your stock.
Deeper buckets can also help you avoid flare ups.
The third point and final point is especially important in colder climates. Depending on your quenching medium, this liquid can freeze in the winter, causing your bucket to break as the medium expands. Brine tends to have a lower freezing point than straight water. As for oil, it just depends on what kind of oil you use.
59. Blacksmithing Quenching Medium: Oil, Brine, Water
Steel with sufficient carbon can be hardened by quenching the heated stock in oil or brine. The science behind this is quite extensive, and beyond the scope of this article. I will however leave you with some pointers.
You see some people suggest using motor oil as a quenching agent, I would recommend caution with motor oil. Quenching with Motor Oil stinks to high heaven, and the oil may be filled with hazardous contaminants, especially if it’s used oil.
Now I will admit, a lot of what I have heard about using motor oil as a quenching agent is hearsay from the internet. I have not seen an in depth study on this topic. However, in the face of uncertainty, I think there is more potential downside to using motor oil than upside, so take that for what it is.
Unless you are optimizing for a high use mission critical tool, using bonafied quenching oil, vegetable oil, or just plain old water, is more than enough for most projects. If you know the name and type of the material you are working with, you can always look up the optimal quenching agent.
If you are unsure and don’t want to look up the optimal quenching agent, oil works well with most steels.
If you are using an oil quench, make sure that water doesn’t containemant the oil, this can cause explosions of hot oil…no bueno.
It is worth looking up the optimal agent, as your stock can crack or not harden properly if you are using a finicky type of steel. There are oil hardening steels, water hardening steels, and even air hardening steels.
A note on low carbon steels: some of these do not respond to quenching as there is an insufficient amount of carbon in the material. You can still case harden these tools by using outside sources of carbon such as charcoal.
Finally, I should point out that this section was not intended as a how-to. When quenching there is always a risk for flare ups when you pull the stock out of the oil. Metallurgy is a deep topic, and I suggest further research before attempting to quench something on your own. The 500 odd words in the last two sections are not sufficient for a good quenching operation. I was just trying to give a brief overview for this article on blacksmithing tools.
Check out https://www.ccohs.ca/oshanswers/safety_haz/metalworking/heat_treating.html for a more rigourous overview on saftey.
60. Marking Tools
As the old saying goes, measure twice and cut once. There are a variety of tools a metal worker can use to mark their stock. As with many things, there is no best tool, and which one you will use will come down to personal preference and the project at hand.
Some common marking tools found in a typical workshop:
- Scratching Tools (scratch the line into the surface)
- Pens
- Chalk
- Angle blocks
- Setup blocks
- Straight Edges
- Sine Bars
- Edge and Center Finders
- Gages
And so on. This list could be hundreds of items long!
61. Chisel Plate
A chisel plate is simply a disposable plate that can be placed on a surface in order to protect the surface in question. As the name would suggest, this plate can be used during chisel operations to avoid scuffing up the surface of the anvil or table that is holding the piece.
62. Tools For Making Screws: Taps & Dies
Historically screws have been a bit tricky to make ,especially the small screws that we think of today. In times past, it was generally easier to use rivets, as they were more economical to make, and fairly easy to install.
Because of this, screws didn’t become widely used until the second half the nineteenth century. The invention of the screw-cutting lathe in the late eighteenth century made it much easier to create screws.
Despite the relative unpopularity of screws before the nineteenth century, there is evidence of thread-cutting tools dating back to the seventeenth century. Prior to the screw-cutting lathe, smiths made these screws using a number of tools.
63. Dies, Screw Plates, and Jamb Plates
Dies are tools that thread rods, turning them into screws. Screw Plates and Jamb Plates are simple boards that contain multiple sized Dies.
Dies are usually attached to a some sort of plate/board with handles. The die is placed on the rod and is turned until a screw is created with sufficiently long threading.
64. The Screw Tap
The tap performs the inverse function of the Die. Taps thread the holes that screws will be placed into. They are used in a very similar fashion to drills.
When using either a tap or a die, it’s important to remember to do one half backwards turn for every full forwards turn. This allows debris to fall through as you are cutting your material.
65. Drills
I discussed punches earlier, another option for creating holes in a piece of stock are drills. In the sections below, I will go over both historical and modern drills.
66. Historical Blacksmithing Drills
Metal workers have been drilling holes into metal for a long time. In situations where a hole punch is too crude, a smith will often turn to his drills. Before the invention of electricity, these usually came in a number of flavours:
- Bow Drill
- Pump Drill
- Beam Drill
- Hand Cranked Post Drill
- Mechanical Hand Drill
- Mechanical Breast Drill
Nowadays we have many electric options for drills that make life significantly easier.
Still, I think it’s fun looking back and seeing how things used to be done!
67. BlackSmithing Reamers
A reamer is a rotary tool used to enlarge previously cut holes. They can also be used to remove burs caused by a previous cutting. Modern reamers tend to have multiple highly precise cutting edges placed radially around the axis of a cylindrical body.
For a long timer however, smiths would make their own reamers. These were often much more crude than their contemporary counterparts. Homemade reamers in the past were often nothing more than flat forged bars that featured a slight taper at the cutting end to facilitate the start of the cut.
Interestingly, some of these homemade reamers had two heads of different sizes and had a shaft that was bent at a ninety degree angle. This allowed the smith to hand crank the reamer by grabbing the opposite head. Talk about maximizing tool space!
68. Tool Stand
Workshop space often comes at a premium. Maximizing the use of your work space while still be able to quickly access every tool you will need is vital. A good sturdy tool stand Allows you to properly organize your workshop. An unclutter shop will clear your mind and allow you to focus on the interesting parts of your work!
69. Rivet Headers, Nail Headers, And Bolt Headers
These tools come in a multitude of different flavours, but they all have the same job of forming the heads of rivets, nails, and bolts.
Most headers are composed of a handle, a head, and a eye (hole in the head) that is the size of the stock to be used.
Headers work by sliding the eye over the pritchel hole on the anvil. The piece of stock that will be turned into the nail is then slid through the eye of the header and into the pritchel hole.
The smith then beats the top of the stock into the hole until the end of the stock smushes over the edges of the eye. Work continues until the piece resembles the head of a nail/rivet/bolt.
To finish up, the smith then cuts the opposite end of the stock to the desired nail/rivet/bolt length.
Most headers are about 6-8 inches long, and set to a width that is comfortable for the smith.
70. Rivet Header
There are many ways to make a rivet, and not all rivet headers prescribe to the pattern laid out above. As I mentioned earlier, some people just use a monkey tool to create a rivet head.
If you are looking to make a perfectly spherical rivet head, this requires an additional tool. This tool is simply a small swage that is placed on top of the stock after it is placed in the rivet header tool. This small swage is hammered on top of the rivet creating a spherical head.
71. Nail Header
The eye of the nail header varies according to the type of nail being made. Horseshoe nails require an eye that resembles an inverted pyramidal depression. RoseHead nails only need a slightly rounded depression. Tacks and broadheads just need a flat surface.
Nail Manufacturers prior to the industrial revolution of course had special setups. They would often have a stake anvil with the proper nail eye sizes drilled into it. Behind these nail eyes would be a fixed-in-place cutting hardy, allowing the smith to stay in one place and really crank out nails at a high rate.
72. Bolt Header
The eye of the bolt header is shaped to match the different types of bolts. Some bolts have round heads, some hexagonal, and some square. Generally bolts have a square shoulder, but adjustments can be made to the header to create beveled bolts.
73. Crucible
Ok, ok, this isn’t technically a blacksmithing tool.I decided to put it in anyways as crucibles and the entire process of casting is incredibly cool. A crucible is basically a ceramic pot that is designed to withstand ridiculously high temperatures. This comes in handy, as crucibles are used to melt metal, so that the molten metal can be poured into a cast.
74. Flux
Flux is a tool that is used to aid in forge welds. Flux helps get rid of unwanted scale and also prevents unwanted oxidation during the weld.
Forge welds with wrought iron can often be done without flux, but flux make the welding process much easier.
75. Files
Files are pretty straight forward. They are used to file down rough edges in a piece of stock.
76. Snarling Iron
Snarling Irons are a z shaped tool that are used to form bumps and patterns in hard to reach places. They are most commonly used in decorative work. One end of the snarling iron typically has a semi-spherical shape.
77. Fuel source
All forges will need a fuel source. Most forges generally use lump hardwood charcoal(not the grilling briquettes), bituminous coal, or propane. Which you use comes down to preference along the factors of cost, mess, obtainability, and forge setup.
78. Veiners
This tool is called a veiner as it is used to form the “veins” of leaves.
79. Spring Tools
This is a class of tools that use a bounceback “spring” mechanism to make the work easier. They often come in the form of spring swages and spring fullers. They allow the smith to work two sides of a piece of stock in a fairly even fashion.
80. Brush/Heavy Wires
A wire brush is used to remove scale and other oxides from the surface of a piece. When used properly it can improve the aesthetics of a piece…making people more likely to buy it from you!
81. Shear Cutters
Shear cutters prove the modern blacksmith with yet another method for cutting stock. Hand held shear cutters may be used for sheet metal, and bench shear cutters may be used for thicker stock.
82. The Traveler Wheelwright
This is a basic wheel shaped tool used by wheelwrights to measure wheels.
83. Blacksmithing Drifts
Drifts are somewhat similar to punches, as they are often used to create or widen holes in a piece of stock. The most common use for drifts in blacksmithing is to create the proper shape and finish to the eyes of hand tools.
These drifts can come in just about any shape that you as a smith can dream up. They can be used to create triangular,circular, oval, pentagon,hexagon,octagon, and any other n-gon shape eyes in tools.
The fast majority are just a simple oval shaped piece of stock that create a pleasant and unassuming oval shaped eye in tools such as hammers.
Forge & Forge Related Equipment: Pyrometer, Refractory Bricks, etc!
Below are a few bells and whistles related to the forge:
84. The Blacksmithing Forge
The blacksmithing forge is a hearth that is used to heat ferrous materials to the level of heat necessary for working. Iron based materials are unlike copper and other soft materials because they require significantly more heat in order to be easily workable with a hammer.
The forge honestly requires an entire article in itself, as there are so many different designs for a blacksmithing forge. Instead of covering them all in this article, I will instead point out some of the materials used in their construction.
85. Refractory Bricks
A refractory brick, which is often simply referred to as a fire brick, is a ceramic material that is used to coat the insides of furnaces, kilns, pizza ovens, forges, and other industrial tools. They come in a wide variety of heat tolerances and costs.
86. Insulation Blankets
Another material that some forges use is an insulation blanket. I honestly don’t like them, as they are carcinogenic and have lower heat tolerances than refractory bricks. However, I see them in a lot of forge designs, so they are worth mentioning.
87. Refractory Cement
This is exactly what is sounds like. Many forge designs use refractory cement to glue it all together. While this is incredibly handy, this can make the cement the weakest point in terms of heat tolerance for some designs as many refractory cements have heat tolerances lower than refractory bricks.
88. Pyrometer
Pyrometers are tools that measure the heat of your forge. They are not necessary for most blacksmithing, however they are a hell of a lotta fun to use.
Just make sure to get one that is rated for the heat blacksmithing forges can reach, as many pyrometers are made for kilns which don’t need as high of a temperature.
It’s hard for me to be more specific without going into specific forge designs…but many forges can easily reach welding temperatures (2300+ Fahrenheit).
89. Scroll Wrenches
This is a handheld tool similar to the bending forks I described in the hardy section of this article. They are use in conjunction with a tool called a scroll irons to make scrolls.
90. Bar Stock
Steel bar stock is the raw material that is used to create your projects. Most raw stock comes in the form of 1018 mild steel or 1095 high carbon steel. The size you need depends on your projects.
91. The Guillotine Tool – AKA Smithing Magician
These tools are named after the legendary french execution device. They are often just a top and bottom butcher/fuller that are connected via some plate. Connecting the top and bottom tools makes it very easy for the smith to work both sides of the stock in a smooth and consistent manner.
Safety Equipment
The safety dangers of blacksmithing are pretty straightforward and obvious. You are working with very hot materials, so there is a risk of burns.
92. Safety Glasses
This one is non negotiable, if you do nothing else, please wear safety glasses. Your eyes are fragile and worth taking care of.
93. Hearing protection
This one is easy to forget, but take it from a guy who comes from a family of shotgun shooting men who ignored hearing protection…you must take care of your ears if you want a high quality of life in your later years. No, I don’t think smithing is as loud as shooting guns, but it’s loud enough.
94. Pants
Pants are a good idea, you have less exposed skin this way. Avoid synthetic fibers that will burn quickly or melt onto your skin.
95. Shoes
Flip flops are a bad idea, use closed toe shoes. Don’t tuck your pants into your boots/shoes. Coal and bits of debris do have a tendency to fall, so take your footwear seriously.
96. Gloves
Gloves are used to protect your hands, but they can be a bit misleading so be careful. As you work, moisture can accumulate inside the glove; this moisture can conduct heat fairly well so you must be aware of this phenomenon.
I repeat, don’t let your gloves get wet.
Gloves can give a false sense of security when working with hot stock, avoid grabbing stock that is too hot for your gloves to insulate against.
If a hot piece of coal or slag gets onto your glove, it can be surprisingly hard to get them off quickly.
97. Respirators For Grinding
Always grab a respirator when you are grinding steel. Steel dust is bad for you. A dust mask is not usually sufficient, pay up for your health…it’s worth it.
98. Apron
A blacksmithing apron is a classic piece of attire. At first glance it might seem superfluous, but it’s actually very useful for saving your body and your shirts. If you are doing any sort of grinding or belt work it becomes a must. A welding apron will of course work as well.
All in all it’s a handy extra layer of protection. Trusty tools break, things shatter, and sometimes you are just tired and careless. Aprons are a worthwhile investment that will protect your body and your clothes.
Modern Machining Tools
While these tools are not used in historical reenactments of metal working, they are of course used in production shops. I will go over them very briefly.
99. Angle Grinder
These are highly versatile tools that can be used for cutting, grinding, and cleaning materials. They are staples in all machining shops. A word of caution: angle grinders are the source of a lot of shop accidents, use them with care.
100. Welding Equipment
Forge welding is a tricky and time consuming process. In many situations it makes sense to use a more modern welding machine as they are cheap and get the job done quickly.
101. Grinders – Belt and Bench
All of these tools feature an abrasive wheel or belt and are used for abrasive cutting. They are incredibly handy but have a tendency to wear out quickly.
102. Buffers
These are used for polishing and finishing. While many blacksmiths appreciate a more rustic look to their works, many clients want things nice and shiny.
103. HackSaws
Hacksaws are fine toothed saws that are incredible handy for cutting cold metal. While many blacksmiths cut their stock using hardies, I think it’s worthwhile to consider the hacksaw for some projects.
104. Cold Saw
Blacksmithing purists may not like this one, but cold saws are a modern piece of technology that can very efficiently cut stock. If you are working with metal for a living, it’s worth having one of these bad boys.